Lab B2: DEX security: Arbitrage
Introduction
In traditional finance, arbitrage is a behavior to buy and sell the same asset in different markets in order to profit from different exchange rates. The same behavior applies to decentralized exchanges (DEXes), where a trader trades with two DEX pools and exercises buy-low-sell-high strategy.
In this lab you will pretend to be both the trader hunting for the illicit profit and the DEX designer taking steps to defend DEX pools against arbitrage opportunities.
| Tasks | Points | CS student | Finance student |
|---|---|---|---|
| 1 | 30 | Required | Required |
| 2 | 30 | Required | Bonus |
Exercise 1. Attacking AMM by arbitrage
Suppose there are two DEX pools, OttoSwap and CuseSwap, each of which maintains the same tokens, TokenX and TokenY. For instance, OttoSwap stores $3$ units of TokenX and $1$ units of TokenY. CuseSwap stores $1$ units of TokenX and $4$ units of TokenY.
An adversary, Malloy, can conduct an arbitrage across the two pools to extract positive profit. For instance, Malloy can swap $1$ TokenX for $dy$ units of TokenY on CuseSwap. Through the constant product function, we can have $dy=2$. Malloy can then swap $2$ TokenY for $dx$ units of TokenX on OttoSwap. Again, through the constant product function, we can obtain $dx=2$. Thus, after these two swaps, Malloy can extract a profit of $dx-1=1$ unit of TokenX.
In practice, while Malloy can carry out the two swap calls in two separate transactions, there is a risk of one transaction succeeding and the other failing. In that case, Malloy may miss the timing/opportunity of extracting positive profit. Thus, Malloy wants to run the two swaps in a delegated smart contract. The system architecture is depicted in the figure below.
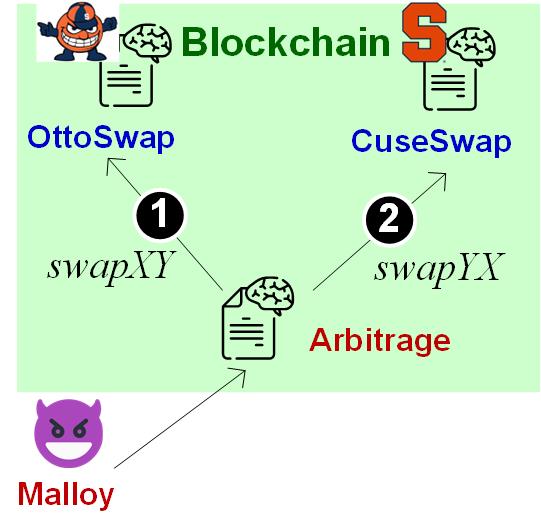
In this exercise, you are required to implement the delegated smart contract ArbiAtomic to support atomic arbitrage and extract positive profit. Contract ArbiAtomic supports a series of functions as follows. Malloy calling function arbitrageUVXY(uint amount) will invoke Pool PU's swapXY(amount) to do the first swap before invoking swap on the other Pool PV.
pragma solidity >=0.7.0 <0.9.0;
contract ArbiAtomic {
  AMMPool poolU; AMMPool poolV;
  constructor(address _poolU, address _poolV){
   poolU = AMMPool(_poolU); poolV = AMMPool(_poolV);
  }

  function arbitrageUVXY(uint dx) returns (uint) public payable {
   // fill out the following with your code
  }
}
You will be given the smart-contract code implementing a constant product AMM (CPMM) and a BaddToken supporting approve/transferFrom.
Note that in the above code snippet, we reuse the same interface of AMMPool as defined in Lab B1 [link].
Your code will be tested using the test case and running the instructions below. Your code implemented inside arbitrageUVXY() function neds to return the profit, that is, the number of extract TokenX Malloy earn by arbitrage.
- Deploy
BaddTokenSC twice to create instances ofTokenYandTokenX. - Deploy the given
CPMMSC twice to create instances ofPUandPV; each instance is linked to bothTokenYandTokenX. - Make sure Pool
PVinitially has 1TokenXand 4TokenY, and PoolPUinitially has 3TokenXand 1TokenY. - Deploy your implemented
ArbiAtomicSC against PoolsPUandPV. The deployed SC is denoted byAA. - Let an EOA
McallTokenX's functiontransfer(AA,1). - Let the EOA
McallAA's functionarbitrageUVXY(1).- Your code of function
arbitrageUVXY()should return the value of $1$.
- Your code of function
- The expected outcome regarding different accounts' balances is in the following test-case table.
| Calls | X.bal(M) |
Y.bal(M) |
X.bal(PU) |
Y.bal(PU) |
X.bal(PV) |
Y.bal(PV) |
X.bal(AA) |
Y.bal(AA) |
|---|---|---|---|---|---|---|---|---|
| Init state | 1 | 0 | 3 | 1 | 1 | 4 | 0 | 0 |
[M,X].transfer(AA,1) |
0 | 0 | 3 | 1 | 1 | 4 | 1 | 0 |
[M,AA].arbitrageUVXY(1) |
2 | 0 | 1 | 3 | 2 | 2 | 0 | 0 |
In the above table, [M,X].transfer(PV,1) means EOA M externally calls TokenX's function transfer() with arguments PV and 1.
Exercise 2. Defending AMM against arbitrage
The cause of arbitrage is the price differences across multiple AMM pools. To mitigate arbitrage, one can “reroute” swap requests to reduce or eliminate the price differences.
Consider the example with two pools where OttoSwap's pool PU has $xU$ / $yU$ units of TokenX / TokenY. CuseSwap's pool PV has $xV$ / $yV$ units of TokenX / TokenY. Initially, the exchange rates at the two pools are different.
Suppose there is a normal swap request from benign user Alice. Alice wants to swap $dx$ units of TokenX for TokenY. Instead of routing Alice's request to just one pool, the re-routing mechanism splits $dx$ into two values $dxU$ and $dxV$. It then “re-route” $dxU$ to Pool PU and $dxV$ to the other Pool PV, such that the exchange rates between the two pools are brought to the same value. In other words, with swap rerouting, the exchange-rate imbalance can be eliminated and never be created.
In general, how to split a swap can be modeled as a constraint-solving problem:
$$ \begin{eqnarray} dxU+dxV&=&dx \ xU*yU&=&(xU+dxU)(yU-dyU)\ xV*yV&=&(xV+dxV)(yV-dyV)\ (xU+dxU)/(yU-dyU)&=&(xV+dxV)/(yV-dyV)\ \end{eqnarray} $$
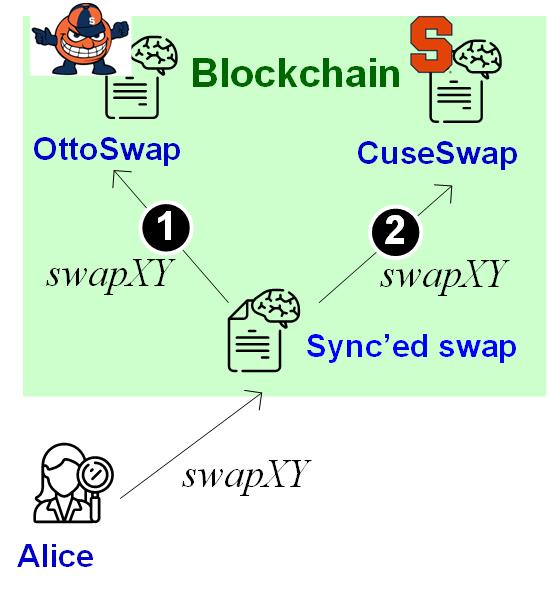
In this exercise, you will implement a ReRouter SC with the following function signature. The system architecture is depicted in the figure above.
pragma solidity >=0.7.0 <0.9.0;
contract ReRouter {
  AMMPool poolU; AMMPool poolV;
  constructor(address _poolU, address _poolV){
   poolU = AMMPool(_poolU); poolV = AMMPool(_poolV);
  }

  function rerouteUVXY(uint dxU, uint dxV) public payable {
   // fill out the following with your code
  }
}
Your code will be tested using the test case and running the instructions below:
- Deploy
BaddTokenSC twice to create instances ofTokenYandTokenX. - Deploy the given
CPMMSC twice to create instances ofPUandPV; each instance is linked to bothTokenYandTokenX. - Make sure Pool
PUinitially has 1TokenXand 4TokenY, and PoolPVinitially has 1TokenXand 9TokenY. - Deploy your implemented
ReRouterSC against PoolsPUandPV. The deployed SC is denoted byR. - Let an EOA
AcallTokenX's functiontransfer(PV,?dxU). - Let the EOA
AcallR's functionrerouteUVXY(?dxU,?dxV). - The expected outcome regarding different accounts' balances is in the following test-case table.
| Calls | X.bal(A) |
Y.bal(A) |
X.bal(PU) |
Y.bal(PU) |
X.bal(PV) |
Y.bal(PV) |
|---|---|---|---|---|---|---|
| Init state | 3 | 0 | 1 | 4 | 1 | 9 |
[A,X].transfer(R,3) |
0 | 0 | 1 | 4 | 1 | 9 |
[A,R].rerouteUVXY(?dxU,?dxV) |
0 | ? | 1+?dxU | ? | 1+?dxV | ? |
You will need to figure out what values variables ?dxU and ?dxV should take, so that the end state after call [A,R].rerouteUVXY(?dxU,?dxV) meets the following two conditions:
- The exchange rates of pools PU and PV are the same.
- EOA A has swapped out all TokenX she has, leaving balance to be X.bal(A)=0.
Deliverable
- For all exercises, you should submit screenshots showing your contract executing the described workflow successfully.
- If you fail to submit smart-contract code (in
.solfile), your submission will be subject to up to 70% grade deduction.
- If you fail to submit smart-contract code (in
- Submit your solidity smart contracts for each task.
- If you fail to submit the screenshots of the program execution, your submission will be subject to up to 50% grade deduction.
- For Exercise 2, report the values you calculate
?dxUand?dxV.